EFFECTIVE PUSH UP WORKOUT ROUTINE IN ONLY 7 WAYS!

Let’s identify the obvious before you go ahead, you are thirsty in knowing the trick in a successful and effective push-up workout routine that is why you are here. You are in great luck today because you came to the perfect site! Maybe you are wondering what is the proper way to do a push-up?
There are a lot of ways on how to build those muscles, but then again, a lot of memorization to do. Aside from this, it only focuses on push-up alone which will only target a few parts of your muscles. So, why settle with just a push-up? wherein you have all the time and body to do more for better and awesome results. Therefore, let us do away with the memorization and focus on achieving a perfect workout exercise that will challenge and bring you closer to that healthy lifestyle and ultra-fit body of yours.
Push-up is basically the very essential, or to best describe it, ultimate, workout in aiming your summer body goals, not only for men but for women as well. Most of all, you are not only going to learn about a perfect push-up routine to leave your body satisfied and fulfilled but you will also figure out different variations that will suit your workout level and other tricks to make your workout experience even more interesting and fun.
What is beneficial too, is that this workout session targets your chest, abs, back, arms and legs since it activates nearly every muscle in your body just like steppers exercise. It sounds very tiring already, right? But prepare to be wrong, because you will be mesmerized by the easy-hacks we have in store for you to have an awesome workout. Continue scrolling down to know what I mean.
THE TOP 7 EASY HACKS TO A PERFECT PUSH-UP WORKOUT
The things you will be doing will actually require a lot of sweat, literally! Determination is quite the key here, nevertheless in any workout, like as what they say “nothing great comes easy”. Despite how physically challenging it will be, you will find these hacks very convenient and effective in achieving that dream body you have forever wished for.
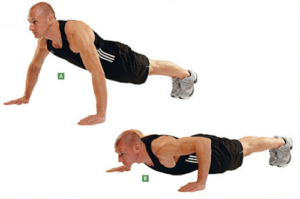
Medium-Grip Push-up
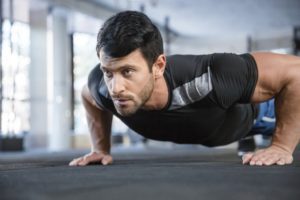
This particular push-up is the basic of all push-ups. This will focus more on your chest area and arms. You can try to explore by doing this push-up while using a bounce ball, doing it in a bench, or a BOSU ball.
How to do it:
- Lie on the floor face down and body straight with your toes on the floor and the hands same as your shoulder width.
- Push yourself up and make sure that your arms are fully extended.
- Lower yourself until your chest almost touches the floor as you inhale.
- Using your pectoral muscles, press your upper body back up to the starting position. As you do this, make sure to feel your chest squeezing to ensure proper execution. Breathe out as you perform this step.
- After the second pause, you can now repeat steps two to four according to your desired number of repetitions.
Variations:
- If you are new to this workout or is a beginner, and think you do not have the required strength to perform this exercise, you can start by bending your knees just to ease the whole tension. You could also perform it using a wall as substitute for the floor for the mean time.
- For those who are already advanced, you can further challenge yourself by elevating your legs, like placing them on a bench or a higher surface. This is to intensify the workout and would further target the chest area.
V-Ups
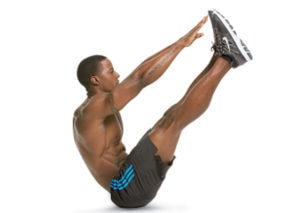
V-ups are your abdomens greatest friend. Want a toned stomach? This is the exercise to love, since this particular movement targets the abdominal muscles, along with the obliques and it also challenges your back muscles. It is like, you’re hitting two birds with one stone. A lot of people who actively workout enjoy this specific exercise for it is relatively easy. There are no equipment needed and no complicated moves to keep in mind. It’s a matter of letting out the inner gymnast in you.
How to do it:
- Lie flat on the floor with the lower back pressed into the ground and arms extended beside your legs.
- The back of the shoulders should touch the floor and the palms should face the ceiling.
- Keep the feet together and the toes pointed at the ceiling.
- In a synchronized movement, lift both your legs up, ensuring a straight and tight formation and lift your upper body in a mission to reach your toes.
- Engage and contract your abdominal muscles as you pull-up towards reaching your toes.
- Slowly lower the body back down to the starting position.
Variations:
- For beginners, you can start by simply placing your arms beside your torso and upon doing the tuck movement, you just simply reach for your toes.
- For those who are already advanced, you can start with your arms extended far off your head, then as you tuck make sure that your arms and legs are straight and steady, which means no bending nor breaking off from the position. To add intensity, as you lower down to go back to a lying down position, leave a few-inched gap from your feet and hands to the floor. The closer to the floor the better. For it will require additional abdominal muscle contraction.
The Bicycle
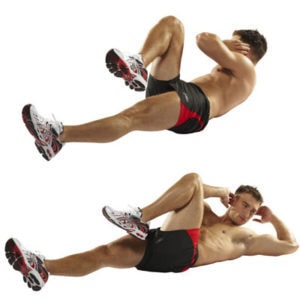
It’s time to go for a ride in this work-out journey! This by far is the most fun part of this routine, it is like riding a bicycle, but with a little twist. This targets mainly your abdominal muscles.
How to do it:
- Lie on the floor. Stretch your arms at the sides of your torso and make sure your legs are also stretched and close together, no gaps, no spaces between thighs.
- Place both of your hands at the back of your head. You can interlock your fingers if you want, or you can just plainly touch your head with it. Either ways, both will work.
- Raise your legs at a 45 degree angle. In order to achieve a full effect of this movement ensure that your legs are straight and stiff. But if they bend, don’t worry, it is okay and perfectly normal. Continuous practice and exercise will improve your leg strength and flexibility.
-
Touch your right elbow to your left knee. Now, lift your head and use your elbow to touch your knee. As your elbow and knee make a contact, keep the other leg straight while still maintaining that 45 degree angle.
- As you lift your head, you have to contract your abs as well. Use your abdominal muscle to pull-up your upper body as you touch your knee.
- At the same time, tense your leg as you bend them towards your elbow and stiffen the other leg ensuring a straight and steady figure. And be sure that as you pull-up your upper body your elbows stay at the back of your head. Never beside or aligned touching your ears.
5. Now touch your left elbow to your right knee. At the same time, straighten your left leg, keeping it off of the floor. Don’t forget to tighten those abs. You’ve now completed one bicycle crunch.
6. Perform bicycle crunches in sets of 10-20 repetitions (or on how you prefer it, depending on your skill level). Don’t forget to rest between sets.
Variations:
- You can play with this type of workout because this does not actually require any equipment to increase intensity or progression. So both beginners and advanced will experience the same effect.
Close-Grip or Diamond Push-ups
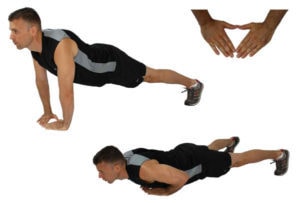
Now this type of push-up will be the trickiest yet most effective way to achieve those toned arm muscles. It is similar with any other push-up, but you position your hands closer to each other as you do the movement. You can choose to either simply position your hands closer to each other or follow a shape of a diamond.
How to do it:
- Position yourself in a mat or carpet. This is to provide your hands cushion as you do the workout. Doing it on a bare floor or hard surface might injure your hands or wrist.
- Do the standard push-up position. Lie on the floor with your back facing the ceiling and face facing the floor. Arms and legs stretched out to achieve proper posture as you begin.
- Place your hands under your chest. Extend your arms as you push up from the floor, make sure that your arms are straight and stiff. You can either opt to position your hands a few inch apart from each other, or follow the shape of a diamond. Touch your forefingers together and your thumbs together. This forms your diamond.
- Lower yourself to the ground, then push up again. This completes one diamond push-up. Be sure that your back is straight as well, and your abs are contracted. Imagine yourself as a wooden plank to have a clearer picture on what you should look like as you do your repetitions.
Variations:
- This will be the same as with our Medium-Grip Push-up.
- For beginners, you can bend your knees to not shock your body with the intensity of a full-positioned push-up.
- For advanced, you can add intensity to this workout by elevating your legs. You can either place them on a bench or use anything of higher surface.
Wide-Grip Push-up
Now it’s time to ease the tension on your chest and let us move the focus or target to your back. This particular push-up challenges the shoulders, back muscles and tones down those extra back fats because you lower down your body while using wide-positioned arms to support your body, as a result, your back contracts and tenses the more apart from the chest.
How to do it:
- Position yourself the same as with a standard push-up but rather than positioning your arms shoulder-width it will now be wider than your shoulders. Be sure that your body is straight and your hips does not sag. This is now your starting position.
- You can start with either a flexed elbow or full-stretched arms. But it’s best to start with straightening your arms in order to balance yourself properly as you begin with your repetitions.
- Lower your chest to the floor as you inhale.
- Using your chest muscles, push your upper body back up to the starting position by extending your elbows. Exhale as you perform this step.
- Repeat the movement according to your desired amount of repetitions.
Variations:
- Still the same variations with the Medium-Grip Push-up
T Push-up
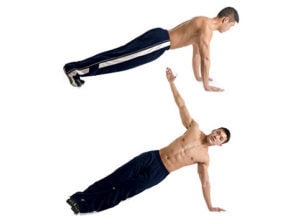
It is time to test our balancing skills with the T Push-up workout. This targets your abs and arms the most for these parts are the most required body part to successfully perform this movement.
How to do it:
- Lie face down on the floor supported by your hands in the standard push-up position.
- Do a normal push-up, but as you extend your arms and push your body up, your right arm will be extending until your fingertips faces the ceiling. You twist your torso to face the side along with your feet. Find your balance as you do this. Tighten your abs and maintain a straight posture.
- Return to the standard push-up position.
- This time, repeat the whole movement on the opposite side. Return back to the standard push-up position, this now completes 1 T Push-up.
- Repeat whole workout on desired number of sets and repetitions.
Variations:
- For beginners, you can ease the tension and lower the intensity by bending your knees. Make sure to place a mat or any material you are comfortable with to protect your knees from the hard surface.
- For advanced, while this push-up is already a kicker, you can intensify this workout by using dumbbells to challenge yourself with the additional weight.
Burpees
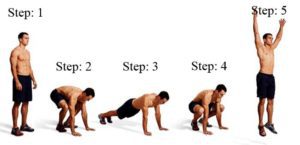
The final destination for our Effective Push-up workout routine is the famous Burpees. The Burpee is the king of all push-ups because it does not only targets your chest, arms and abs but your whole body. This workout requires every muscle in your body to function and is the most effective way to gain those muscles you have always dreamed of.
How to do it:
- Stand with your feet hip-width apart. Arms are placed on the sides of your torso and back is straight.
- Lower yourself down in a squat position as you place both hands flat, touching the floor.
- Kick legs backwards into a standard-push up position and immediately lower your chest down the floor to complete a push-up.
- As you extend your arms completing one push-up, thrust your feet forward going back to the squat position.
- And finish off with performing a jump by pushing your whole body using your leg muscles and strength, arms extended as if you are trying to reach the sky. This completes one Burpee.
- Repeat whole steps to desired amount of sets and repetitions.
Variations:
- For beginners, you can perform step no. 5 without the jump, rather as you stand, use the balls of your feet to position yourself up.
- It is best to perform this workout to its fullest, both for beginners and advanced. Since, this is the final part of the whole routine, it is effective enough to finish off with all your body muscles functioning.
Now, you have read the different ways of doing a proper and an effective push-up routine, these will now all vary depending on how you discipline yourself when it comes to doing it regularly and the sets and repetitions you engage yourself in. For beginners, you can start slowly, like for example, you can just schedule yourself to workout three times a week. As soon as you notice your body is now getting a hang of the workout, you can now then increase the regularity and intensity of your routine.
There is no doubt, by this time, you are beginning to be excited to start the day tomorrow with an awesome workout. To make it even more motivating to get in shape, this push-up routine does not only tone or strengthen your muscles but they also have various health benefits along the way that enhances other bodily functions such as endurance, blood circulation and even posture. So as you prepare to start with this work-out and begin to touch the floor with your bare palms always remember how in every 1, 2, 3 all your muscles are moving, beginning to transform to that dream body of yours and improving your health to its full potential.